This blog showcases a tool I quickly created to help me with Photo Organization using Python, Tkinter for UI and OpenPyXL for Excel automation. And it is creatively named Photo Organizer.
The Problem:
I recently got married (well, that’s not the problem), but I now have thousands of photos I need to review to create an album. I found it tedious to go through all these photos and select maybe 200 to be included in the album. But there is no easy way to track which images I have already reviewed, which ones I have chosen, etc. Manual sorting was out of the picture as there are thousands of photos. And if you write down one incorrect character in the name, you select the wrong image entirely. I also have my significant other, who will have her selections. Finally, how can one easily send a list of selected photos to the photographer? Should I send him a text file with the names of selected images or copy each photo manually onto a new folder?
The Solution:
Hence, I decided to create an application to organize photos. I wanted a UI to sort images quickly. My first thought was to design a UI similar to Tinder’s simple Yay or Nay options. But it was too decisive, and I wanted something a bit nuanced. So I finally decided to go with the star rating system and have the option to choose later which star ranges I wanted in the album.
The layout became clearer. I wanted a window that displays the image, two buttons to navigate between images and an option to give a star rating. Finally, I want to capture these ratings onto a spreadsheet where I can add a simple filter and create a list.
To accomplish this, I decided to use Python to program, Tkinter to design the layout and user interface and OpenPyXL to automate the creation of spreadsheets.
The final solution looks like this.
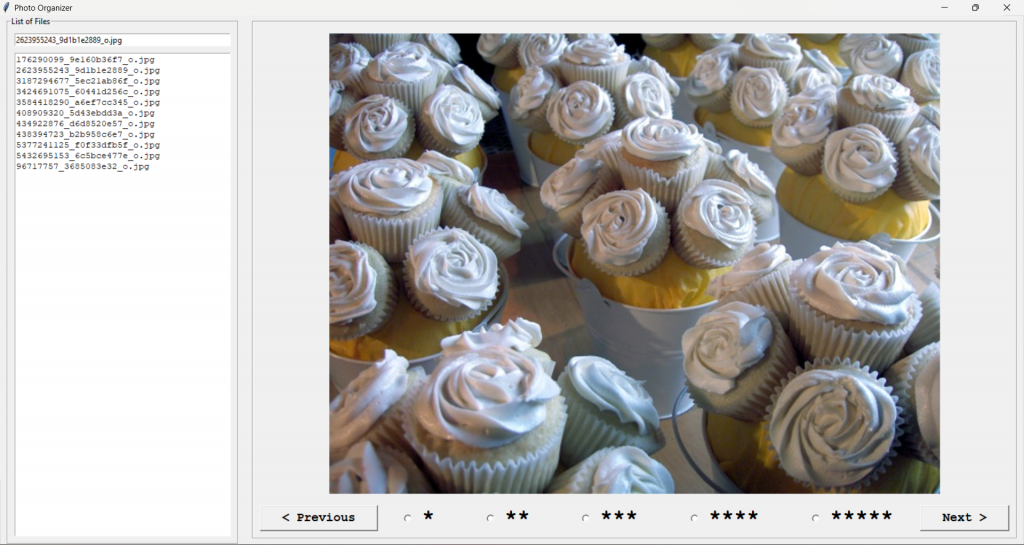
You can see a list of all the files in the folder. Above it, it shows the name of the current image. On the right side, you have the image. Below it, you can see navigation buttons and star-rating radio buttons.
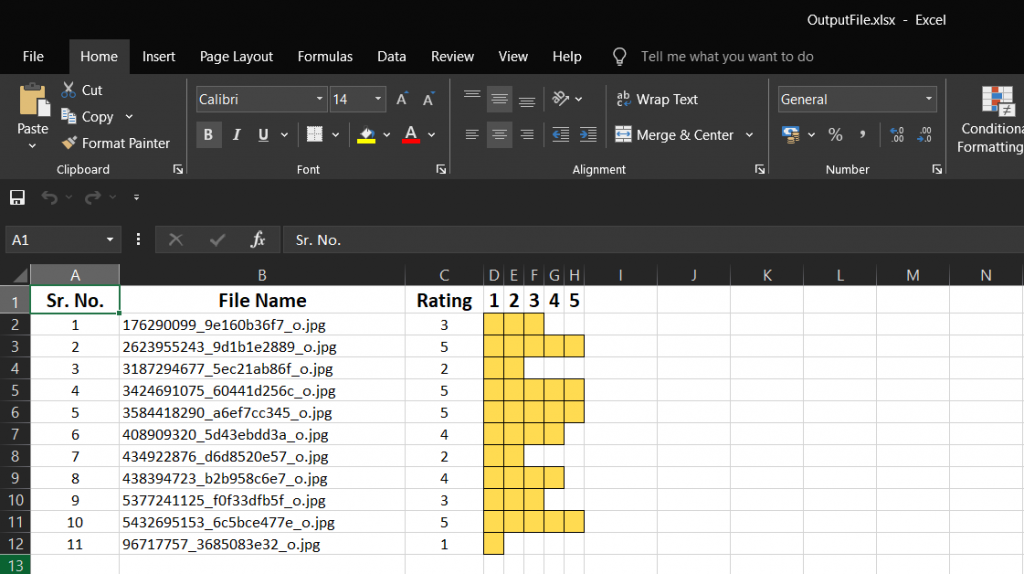
The output spreadsheet looks like this.
How to use it?
One needs to copy this Python file to the folder with photos you want to rate. Users can use the two buttons to navigate between the images. If there is an existing spreadsheet, then it will pull the ranking from it. If the user changes the rating, the program will update the ranking. The user can find the generated spreadsheet named OutputFile.xlsx in the same folder, after closing the application.
In addition, the photo organizer also filters out the image files from all the files in the folder. Users can use the left and right arrow keys to navigate between the images. And after closing the application, it will automatically opens the spreadsheet for review.
My intention with this application was to create something that works well enough. Hence, the code isn’t super polished, but here is the link to the Python program if you want to play around with it. And check out my other hardware projects here.

